Privacy Areas
Privacy Areas is a tool in the CANVID editor that allows you to track and mask sensitive information in your screen recordings. This ensures that private data such as email addresses, credit card numbers, and other confidential information are not visible in your final video.
There are two ways to add Privacy Areas:
- Manually select elements you wish to hide or mask
- Automatically scan the video for sensitive information
Manual
Use this method when you want to pick and hide specific text or elements yourself.
Go to the editor
Finish a new recording, or open an existing project.
Navigate the timeline
In the timeline, go to a moment where the sensitive information appears on screen.
Privacy sidebar
Click the Eye icon to access the Privacy sidebar, then click Add Privacy Area.
Select Text
In the Hide Sensitive Information window, click Select Text.
Review Detected Text
The app will automatically detect all on-screen text, then open the Review Detected Text window.
Start Masking
Click Track and Mask to apply Privacy Areas to your selected text/s. Your recording will be checked to make sure it's hidden in all frames.
Review
Back in the editor, review and check your video.
Automatic
Use this option when you want the app to detect sensitive information automatically.
Go to the editor
Finish a new recording, or open an existing project.
Privacy sidebar
Click the Eye icon to access the Privacy sidebar, then click Add Privacy Area.
Automatic option
In the Hide Sensitive Information window, select Automatically find sensitive or private information.
The app will scan your entire video for sensitive content.
Click Scan Now to begin the process.
When done, review the detected privacy risks:
- Uncheck items you don't want to hide
- Leave checked items you want masked
Start Masking
Click Track and Hide to apply the Privacy Areas.
Review
Back in the editor, review and check your video.
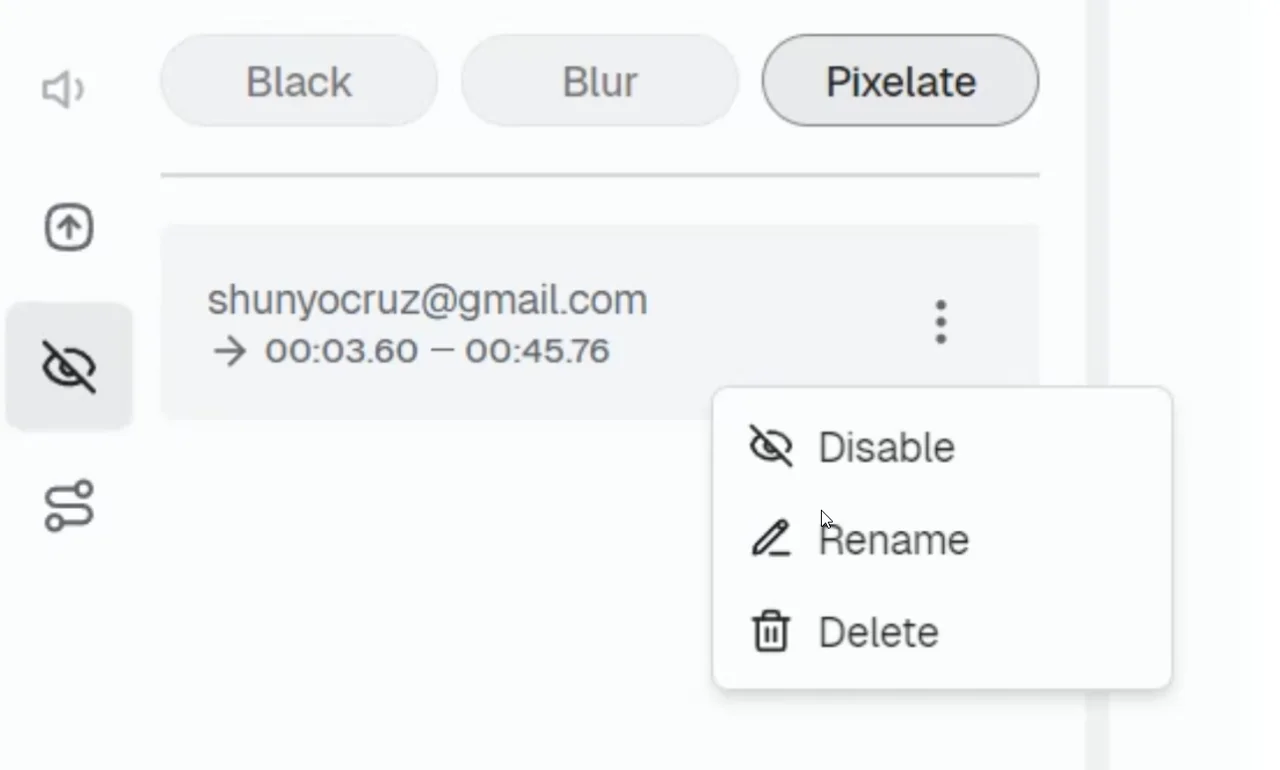
Manage Your Privacy Areas
All Privacy Areas will appear in the Privacy sidebar.
Click the Three dots next to any Privacy Area to:
- Toggle visibility on or off
- Rename the Privacy Area
- Delete the Privacy Area
Mask Style
Click Customize just below the Add Privacy Area button to change the mask style.
- Black: Completely hides the content using a solid black block.
- Blur: Makes the content unreadable while preserving its general shape.
- Pixelate: Obscures the content using large pixels.
Display Keyboard Shortcuts
Learn how to show keyboard shortcuts in your CANVID tutorial videos. Enable shortcut display, customize label size, and manage timestamps for clearer, more engaging recordings.
Project Presets
Learn how to create, use, and manage presets in CANVID to streamline your screen recording editing workflow, apply consistent styles, and save time on every project.